Showing posts with label girls. Show all posts

Wednesday, 6 February 2013

Grandma Tips For Nails


Must try These tips to make your nails look beautiful and strong

  1. Eating cauliflower is good for nails.
  2. Eating garlic makes nails strong.
  3. If your nails are breakin then apply paste of Pomegranate leaves.
  4. Dip your nails in lukewarm milk for sometime that will make nails beautiful
  5. If you are getting burning sensation then put glycerine on the nail while going to bed.
  6. After making lemon juice, scrub the remaining lemon on your nails. This will make nails healthy.
  7. Sometimes we get hurt on toes-Take four drops of water and four drops of Mustard oil in brass vessel, keep mixing till it forms a cream. Put that on the hurt nail, it will ease your pain and new toe nail will be propped.

6 Hottest Spring Fashion Trends


6 Hottest Spring Fashion Trends

1. Bright dresses: First spring time mode of action: trade in your bulky sweaters for bright, flirty sundresses. Go for ones in a vintage cut loke Ariel's for the ultimate girly vibe.

2. Olive and oak bird Printed dress 


3. Neon Point Dress

4. Graphic Leggings: When rocking such a wild print, it's best to limit the rest of your ensemble to one or two solid colors.
5. Milky Way Legging
6. Tropical Print Legging


Hair Chalking

        Everyone love coloring their hairs and trying different colors but what disturbs the most is destroyed and rough hairs at the end. Here's an awesome way to get multi-colored tips without any commitment- HAIR CHALKING! it's super easy, and we can have a ton of fun doing it. Here's how you can get this look..

You'll Need
Soft pastel chalk.
A small spray bottle filled with water
A flat iron or curling iron
Rubber Gloves
A old towel or t-shirt you don't mind getting color on.


STEP- 1
Spray a 1-inch section of hair with water. You don't need to soak, the entire strand, just go as high as you want the color to be.
STEP-2
Color on your hairs with one of the pastels. I recommend choosing about three colors and putting one at a time in your hair. Start with the lightest shade first. since, as you can see, the color gets all over your gloves and you will end up with a muddied version of the same hue throughout if you go dark to light.

STEP-3
Wait for your hair to air dry. This was the hardest part for me- I was so anxious to see the final look!


STEP-4
Using the curling or flat iron, go over each color strand. This sets the color in your hair, so it will last longer. Then brush and style however you normally would

FOOT CARE !


   For starters, while you are doing your washing chores, you can let the soap stay on your foot and brush it off once your chores are over. You could try the milk and atta (whole wheat flour) combination on your feet as well. Believe it or not, toothpaste is known to be great for cleaning and softening the feet. You can round off with a short massage with a cream or a moisturizer.

You can also mix half a bowl of water with half a bowl of lemon juice. Then gently dip paper towels into the mixture and apply to your feet. This should soften, smooth-en and even help remove odors from your feet.

You can make your own foot lotion if you don’t want to invest in any of the lotions available across the counter. You will require a tablespoon of almond oil, a tablespoon of olive oil, a tablespoon of of wheat germ oil and 12 drops of eucalyptus essential or fragrance oil. Mix all the ingredients well, store in a dark colored bottle and rub into your feet. Store it in a cool place.


Need some exfoliation for the hardened skin on your feet and soles? You could take some warm water; mix one of your favorite shampoos or that which you are trying very hard to finish off. Use a foot file to clean and soften the skin and finish off with a moisturizer. You could also use foot scrubs that are available in the market, for effective exfoliation.


Or else, you could make your own strawberry exfoliant. Mix eight strawberries with two tablespoons of olive oil (or sun flower oil) and a teaspoon of kosher salt. You could also add half a teaspoon of finely chopped almonds if you wish. Make a paste of all the ingredients but be careful not to over blend it. Or else the paste will not be very consistent since strawberries have a lot of water in them anyway. Massage it on to your feet, leave it on for a while and then wash off, preferably with warm water

Tuesday, 5 February 2013

Dress your Nails !

Waoo.. Now look at this... you can design your nails according to your outfits.. This looks amazing.. Impress your friends by trying it out..

Nail Art


Nail art is a creative activity that draws pictures or designs fingernails. Its a type of art. These days fingernails and toenails are seen by some as important points of beauty.
So lets learn some designs to look beautiful.
      You apply a clear coat of polish to the nails. Dip the nail into the glitter pot. Make sure the glitter covers whole nail, carefully remove it from the pot, then dip off any excess. The result is gorgeous. Its a matte glitter finish unlike conventional glitter nail polish.


Getting a manicure done at a salon can be pretty expensive especially if you let your nails done weekly. You can easily create your own nail art designs at home using your favorite nail polishes and a little bit of creativity.

Here are some tips and tricks to create your own nail art designs.


  • Remove any traces of nail polish from your nails using acetone free nail polish remover because it is not as damaging for the nail.
  • Cut your nails and file them in the desired shape. 
  • To prevent peeling nails file them only in one direction. Push your cuticles in using a cuticle pusher or cut them if you wish.
  • Use a base coat on the nail before you apply the colored nail polish, to protect your nails.
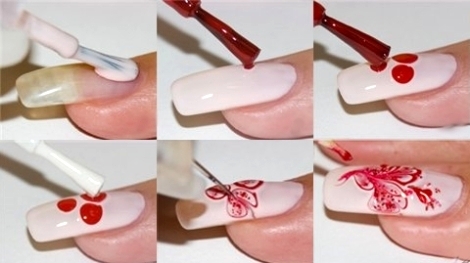
  • Apply a nail color - this will be your base color - starting from middle of your nail, using smooth uniform strokes, then allow nails to dry.


Take a colored nail polish and a toothpick - you can also use a multi-purpose nail sticks from the drugstore, even a needle, but make sure it's thick enough.

Apply 3 dots with the nail polish to the nail, get the toothpick and start dragging the color on the nail, creating unique nail art designs. Let them dry and apply a top coat to prevent colors from chipping and make your nail polish last longer.

You can also create flower nail designs by following these steps:


  • Take the nail polish that you want the middle of the flower to be and apply a drop on a piece of paper. 
  • Take the toothpick and pick up some color with it and make a small dot wherever you want the flower to be ensuring you leave enough space for the petals. 
  • Take the other color and drop a bit on the paper. 
  • Take the toothpick and pick up some color with it and make a small dot wherever you want the flower to be ensuring you leave enough space for the petals. 
  • Take the other color and drop a bit on the paper. 
  • Using the other end of the toothpick take a bit of nail polish on the tip. Apply it next to the other dot. 
  • Take again more nail polish on the toothpick and make another dot next to the last one leaving a tiny space between them. Do the same until you have circled the first dot.
  • You should now have a tiny flower on your nail. Leave the nail polish flowers to dry and apply a top coat with quick strokes so the flowers won't smudge.
Once you learn the basics, you can easily create your own nail art with intricate designs and lots of colors - use your imagination and have fun with it!